Simplepush Blog
Actionable Notifications in Home Assistant
Home Assistant is a popular open-source home automation platform that allows users to control and automate various devices and services in their home. One of the key features of Home Assistant is the ability to send actionable notifications to users’ devices when certain events or triggers occur. These notifications are not just informative but also allow users to take immediate actions from within the notification itself, without having to open the app or navigate through menus.
In this article you will learn how to create actionable notifications with the Home Assistant Companion app and with Simplepush. We will explore the unique benefits and drawbacks of both method.
If you prefer to use Node-RED for your automations, make sure to check out this article on how to send actionable notifications and react to actions in Node-RED.
Home Assistant Companion App
Pros
- Great documentation and community with lots of existing examples on how to setup actionable notifications and more
- Works well in combination with Nabu Casa
Cons
- Requires Nabu Casa or a constant VPN connection to make actionable notifications work outside of your Home Assistant’s local network
- No overview of previously sent notifications and actions
- Limit of 500 notifications per day
- The iOS app will only show the latest notification if your device was offline
The Home Assistant Companion App is the default mobile application for accessing Home Assistant from smartphones or tablets. The app is available for both iOS and Android devices and provides a convenient way for users to interact with their smart home devices and services while on the go.
Simple Example Automation
The following automation shows how to trigger a service if a certain action gets selected while nothing will happen if the other action is selected.
In the variables section we create unique IDs for our actions.
This is required for the case when there are multiple instances of the automation running at the same time (e.g. with mode: parallel).
The wait_for_trigger part of the automation only passes when an event with the exact action ID is fired and this is how we make sure to continue only when an action was selected that belongs to an actionable notification sent from the same automation instance.
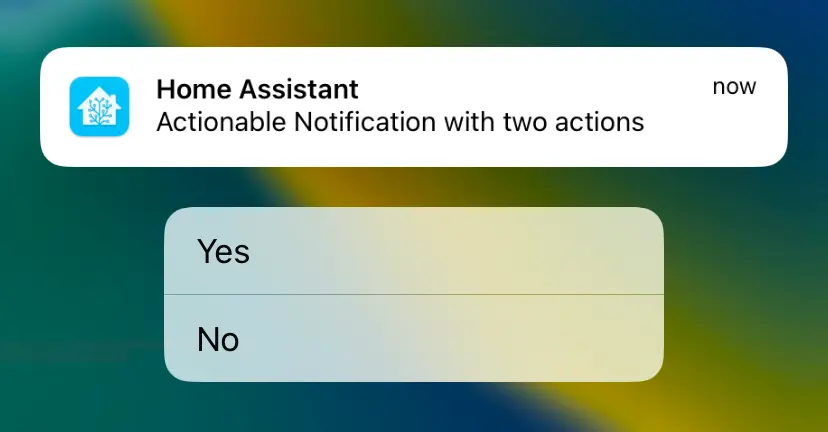
alias: Actionable Notification Companion App Example 1
description: >-
  Example on how to send an actionable notification and react to the selection
  of an action.
trigger: null
action:
  - alias: Set up variables to make action events unique
    variables:
      action_yes: "{{ 'YES_' ~ context.id }}"
      action_no: "{{ 'NO_' ~ context.id }}"
  - alias: Send actionable notification
    service: notify.mobile_app_iphone_von_timm2
    data:
      message: Actionable Notification with two actions
      data:
        actions:
          - action: "{{ action_yes }}"
            title: "Yes"
          - action: "{{ action_no }}"
            title: "No"
  - wait_for_trigger:
      - platform: event
        event_type: mobile_app_notification_action
        event_data:
          action: "{{ action_yes }}"
    continue_on_timeout: false
  - service: logbook.log
    data:
      name: Yes
      message: The Yes action was selected
mode: restart
Example Automation with Template Conditions
Things get a bit more complicated, if we want to react to two or more actions in our automation.
In the following example we wait for the event and then check which action was selected.
A different sequence is executed depending on which action was selected.
alias: Actionable Notification Companion App Example 2
description: "Example on how to send an actionable notification and react to the different actions."
trigger: null
action:
  - alias: Set up variables to make action events unique
    variables:
      action_yes: "{{ 'YES_' ~ context.id }}"
      action_no: "{{ 'NO_' ~ context.id }}"
  - alias: Send actionable notification
    service: notify.mobile_app_<name-of-your-phone>
    data:
      message: Actionable Notification with two actions
      data:
        actions:
          - action: "{{ action_yes }}"
            title: "Yes"
          - action: "{{ action_no }}"
            title: "No"
  - wait_for_trigger:
      - platform: event
        event_type: mobile_app_notification_action
        event_data:
          action: "{{ action_yes }}"
      - platform: event
        event_type: mobile_app_notification_action
        event_data:
          action: "{{ action_no }}"
    continue_on_timeout: false
  - alias: Do something in response to selecting an action
    choose:
      - alias: Yes action was selected
        conditions:
          - condition: template
            value_template: "{{ wait.trigger.event.data.action == action_yes }}"
        sequence:
          - service: logbook.log
            data:
              name: Yes
              message: "The Yes action was selected"
      - alias: No action was selected
        conditions:
          - condition: template
            value_template: "{{ wait.trigger.event.data.action == action_no }}"
        sequence:
          - service: logbook.log
            data:
              name: No
              message: "The No action was selected"
mode: restart
To learn more about what is possible with actionable notifications in the Home Assistant Companion app, check out the official documentation.
Simplepush
Pros
- Works outside of your Home Assistant’s local network without additional solutions like VPNs or Nabu Casa
- Notifications can be end-to-end encrypted
- Support for more than three actions on Android when selected from within app
- Can easily be used for other tasks outside of Home Assistant
- Will show all notifications received while your device was offline
Cons
- Requires a small annual subscription
- Requires the installation of the Simplepush HACS integration
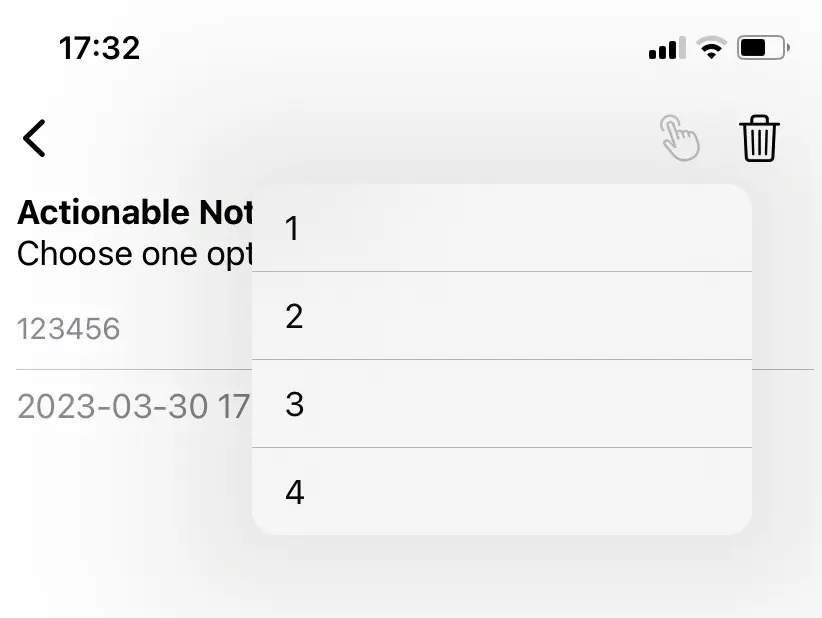
Simplepush is a freemium mobile app for iOS and Android which focuses on simplicity and privacy.
It can be used to send actionable notifications where actions can be selected directly in the notification tray or from within the detail view of a notification in the app.
Setup
Unfortunately for now it’s necessary to install the Simplepush HACS integration in order to send actionable notifications from Home Assistant with Simplepush.
If you install the custom Simplepush HACS integration, make sure to first remove the default Simplepush integration from your Home Assistant instance in case you have it installed.
- If necessary, remove the default Simplepush integration
- Install HACS.
- Once you have installed HACS, go to the Home Assistant web interface and click on the HACS icon in the sidebar.
- Click on the 3 dots in the top right corner.
- Select “Custom repositories”.
- Insert the link to the Simplepush HACS Github page (https://github.com/simplepush/simplepush-hacs-integration).
- Select the “Integration” category.
- Click the “ADD” button.
- Click on “Simplepush HACS” in the HACS overview and download the integration.
- Restart Home Assistant.
- In the HA UI go to “Settings” -> “Integrations” click “+” and search for “Simplepush”.
- Select the Simplepush version without an icon.
Alternatively it is also possible to install the custom Simplepush integration without HACS. For that just follow the instructions on how to manually install the Simplepush HACS integration.
Once the Simplepush HACS integration is added and configured, you can start using the notify.simplepush service in automations.
Simple Example Automation
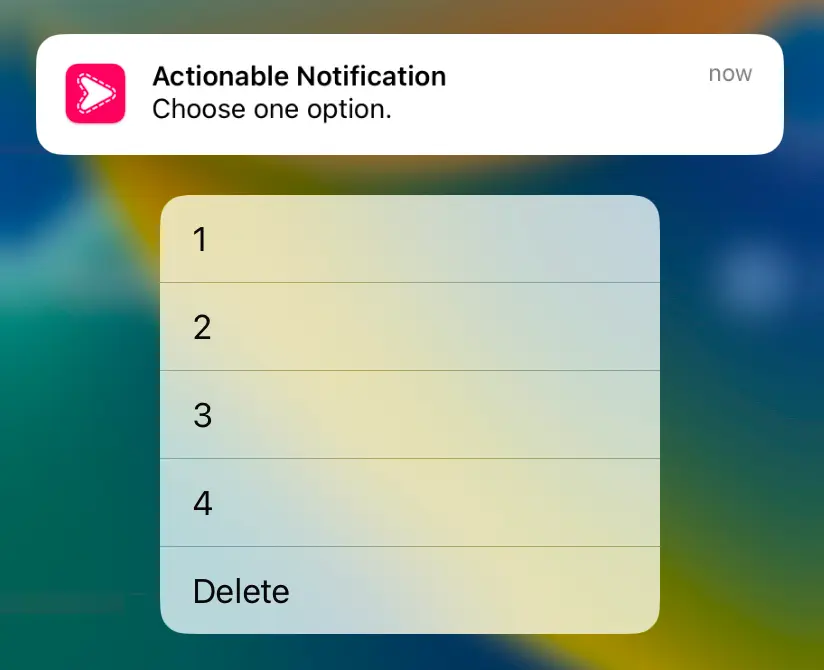
In this example we send a Simplepush notification with two actions (yes and no).
If the receiver selects the yes action within 10 seconds, a success message is saved to the Home Assistant Logbook.
You can remove the action_timeout altogether or increase the amount of seconds until the timeout occurs.
As with the Home Assistant Companion App examples, we need to create a unique action_yes variable, so that when this automation has two instances running at the same time, we only continue for the correct simplepush_action_triggered_event in wait_for_trigger.
alias: Actionable notification with Simplepush
description: >-
  Send an actionable notification and if triggered within 10 seconds, log success message to the logbook
trigger: null
action:
  - variables:
      action_yes: "{{ 'YES_' ~ context.id }}"
  - service: notify.simplepush
    data:
      message: Actionable notification
      data:
        action_timeout: 10
        actions:
          - action: "yes"
            id: "{{ 'YES_' ~ context.id }}"
          - action: "no"
  - wait_for_trigger:
      - platform: event
        event_type: simplepush_action_triggered_event
        event_data:
          id: "{{ 'YES_' ~ context.id }}"
  - service: logbook.log
    data:
      name: Test
      message: Success
mode: restart
Example Automation with Template Conditions
If you want to react to both possible outcomes in your Home Assistant automation, we need to use template conditions to check which action was selected.
In the following example we send an actionable notification with two actions.
If the first action, yes, is selected, then “the Yes action was selected” is printed to the Home Assistant logbook.
If the second action, no, is selected, then “the No action was selected” is printed.
alias: Actionable Notification Simplepush Example Automation 2
description: "Example on how to send an actionable notification with the Simplepush HACS integration and react to the different actions."
trigger: null
action:
  - alias: Set up variables to make action events unique
    variables:
      action_yes: "{{ 'YES_' ~ context.id }}"
      action_no: "{{ 'NO_' ~ context.id }}"
  - alias: Send actionable notification
    service: notify.simplepush
    data:
      message: Actionable Notification with two actions
      data:
        actions:
          - action: "yes"
            id: "{{ action_yes }}"
          - action: "no"
            id: "{{ action_no }}"
  - wait_for_trigger:
      - platform: event
        event_type: simplepush_action_triggered_event
        event_data:
          id: "{{ action_yes }}"
      - platform: event
        event_type: simplepush_action_triggered_event
        event_data:
          id: "{{ action_no }}"
    continue_on_timeout: false
  - alias: Do something in response to selecting an action
    choose:
      - alias: Yes action was selected
        conditions:
          - condition: template
            value_template: "{{ wait.trigger.event.data.id == action_yes }}"
        sequence:
          - service: logbook.log
            data:
              name: Yes
              message: "The Yes action was selected"
      - alias: No action was selected
        conditions:
          - condition: template
            value_template: "{{ wait.trigger.event.data.id == action_no }}"
        sequence:
          - service: logbook.log
            data:
              name: No
              message: "The No action was selected"
mode: restart