Simplepush Blog
Actionable Notifications in Home Assistant with Node-RED
- The Problem with the Home Assistant Companion App
- Setup Node-RED for Home Assistant
- Actionable Notifications in Home Assistant
- Install node-red-contrib-simplepush
- Example Flow 1: Send an Actionable Notification That Asks You if a Light Should Be Turned On or Off
- Example Flow 2: Create a Vote Among Three People With Actionable Notifications
- Example Flow 3: Let the Faster Person Decide
- Example Flow 4: Dynamically Decide Which Actions Your Actionable Notification Should Have
The Problem with the Home Assistant Companion App
There’s one big problem when sending an actionable notification from Home Assistant to the Home Assistant companion app: If your phone is not connected to your local network (where your home assistant server is running), selecting an action button of an actionable notification won’t have any effect since no connection between the app and your Home Assistant server can be established.
Imagine that you have an automation that detects that you left your home while you didn’t turn off the heating. Maybe it’s on purpose since you are just walking the dog for 10 minutes but maybe you are going on a weekend trip for the next few days and just forgot to turn it off. Wouldn’t it be great if Home Assistant could ask you if it should turn off the heating with an actionable push notification?
Unfortunately this won’t work on default since actionable notification do not work with the Home Assistant companion app when your phone is not connected to your local network. Thankfully there are several different ways to make actionable notifications work from wherever you are.
Five Different Ways to Send Actionable Notifications from Home Assistant that Work from Outside of Your Local Network
- Activate remote access for your Home Assistant server by opening it up to the internet (please make sure to follow the security guidelines and to setup SSL to encrypt your connection). This is most likely a bad idea if you have sensitive devices like cameras or door openers connected to your Home Assistant.
- Setup a VPN connection between your local network and your phone which unfortunately in 2022 is still a lot of work.
- Use the paid Nabu Casa service (supports the development efforts of Home Assistant and currently costs $65 per year).
- Setup the Telegram Bot Home Assistant integration and use it to send notifications from Home Assistant (this has the downside that you can only select actions from inside the Telegram app).
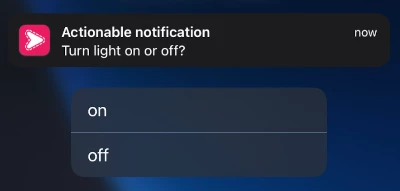
- Install the Simplepush app to receive actionable notifications sent from a Node-RED instance that is connected to your Home Assistant server. Simplepush requires no registration and has a free tier of 100 notifications per month and five actionable notifications per month. Actions can be selected directly in the notification center of iOS or Android.
There is an important security advantage for push notification based solutions (Telegram Bot integration and Simplepush). It’s that with actionable notifications you most likely only expose a small part of your smart home to the internet while all other solutions involve trusting a third party and/or your technical abilities with your whole smart home.
Sending Actionable Notifications with Simplepush from Node-RED and Home Assistant
In this article you will learn how easy it is to send actionable notifications from Home Assistant that work from everywhere. You will also learn how to run Node-RED with your Home Assistant instance.
With Simplepush Actions there is a new way to send actionable notifications from Home Assistant that doesn’t require setting up a VPN or opening up your Home Assistant instance to the internet. It’s also much cheaper ($9.99/year vs. $65/year) than subscribing to Nabu Casa (a service that allows you to control your Home Assistant from anywhere).
Simplepush is an app to receive actionable push notifications on your iOS and Android devices. With the free version you are able to send and receive five actionable notifications per month.
If you are already familiar with how to setup Home Assistant to work with Node-RED, feel free to skip the Setup Node-RED for Home Assistant section and go directly to the Actionable Notification in Home Assistant section.
You can learn more on how to send actionable notifications from Node-RED (without Home Assistant) in this blog post.
It is also possible to send actionable push notifications to Simplepush without Node-RED. All you need is the ability to make HTTP requests (e.g. with curl). With Feedback Actions you immediately receive a feedback id after sending an actionable notification. With your feedback id you can query the state of your actionable notification (learn more in this blog post).
If you prefer to use native Home Assistant automations, make sure to check out this article on how to send actionable notifications and react to actions with native Home Assistant automations.
Setup Node-RED for Home Assistant
Node-RED is a low-code tool for visual application development in the browser.
While Home Assistant excels at bringing all your home automation devices under one platform and keeping the state of those devices, Node-RED is still the better choice when it comes to creating your home automations (at least when your automations get a bit more complicated).
There are two different ways to install Node-RED:
- Install Node-RED as a standalone service and connect it to your Home Assistant server (this works with all flavors of Home Assistant)
- Install and run Node-RED as an add-on inside of Home Assistant (this requires Home Assistant Supervised or Home Assistant OS)
Install Node-RED
This guide will focus on how to install Node-RED if you don’t run Home Assistant Supervised or Home Assistant OS. If you are running Home Assistant Supervised or Home Assistant OS things are a bit easier since you can install Node-RED as an add-on directly from the Home Assistant frontend.
Please follow the official guide on how to install Node-RED.
Once Node-RED is running, go to the Palette Manager (Node-RED Settings → Manage palette) and install:
node-red-contrib-home-assistant-websocket
Alternatively install it from the command line with npm:
$ cd ~/.node-red
$ npm install node-red-contrib-home-assistant-websocket
# restart Node-RED
Put an events: all node into your flow an open its settings.

Once you open the settings, you will see a server field. If you click the pencil icon right next to it, you can enter the base url of your Home Assistant instance and an access token.
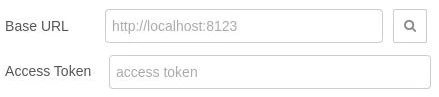
- Base Url is the address and port you use to access your Home Assistant server
- To generate the required Access Token open Home Assistant and click on your user name in the bottom left. Scroll down to
Long-Lived Access Tokenand clickCreate Token. You can then use whatever name you want (e.g. “Node-RED”).
Your Node-RED server is now connected to your Home Assistant and you should have a bunch of Home Assistant nodes in your nodes list on the left.
You can delete the event: all node from your flow.
Actionable Notifications in Home Assistant
In this section you will see how to install the node-red-contrib-simplepush package which is required to send actionable notifications from Node-RED to Simplepush.
In addition you will learn from examples how to create Node-RED flows that send actionable notifications and how to make them trigger subflows (e.g. home automations).
Install node-red-contrib-simplepush
Now that you have a running Node-RED server, which is connected to Home Assistant, everything that is left before we can start creating flows is the installation of the node-red-contrib-simplepush package in Node-RED.
Once again you can either install the package with the Node-RED Palette Manager or with npm from the command line:
$ cd ~/.node-red
$ npm install node-red-contrib-simplepush
# restart Node-RED
If you haven’t installed Simplepush on your iOS or Android device yet, now is the time to do it. After installing the app, it will immediately show you your private Simplepush key. This key is the only information that is required for receiving actionable notifications on your device.
Since you have five free actionable notifications per month, there is no need to purchase the subscription to try out the following examples.
Example Flow 1: Send an Actionable Notification That Asks You if a Light Should Be Turned On or Off
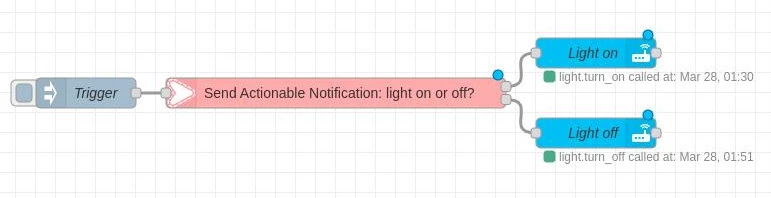
This example flow sends an actionable notification when the inject node is triggered. The actionable notification will have two actions: “on” and “off”. Depending on which action is selected, a light will be turned on or off.
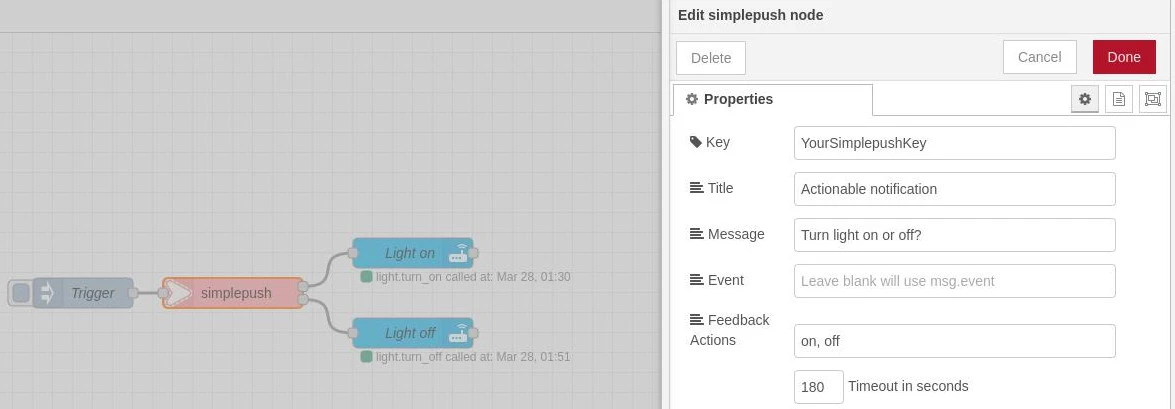
As you can see in the picture above, defining two actions in the settings of the Simplepush node creates two outputs on the node.
The timeout field in the node settings defines a timeout in seconds after which Node-RED will stop listening for actions being selected.
In addition an exception will be thrown (feedback timeout error) that could be intercepted.
If you don’t want a timeout at all, set the timeout to 0.
The top node output of the Simplepush node fires if the “on” action is selected in the actionable notification and the bottom one will fire if the “off” action is selected. If you hover over the node outputs of your Simplepush node, a popup will show up and tell you which output corresponds to which action.
The “Light on” and “Light off” nodes are “call service” nodes. You can find the “call service” node in the Home Assistant section of the node list on the left.
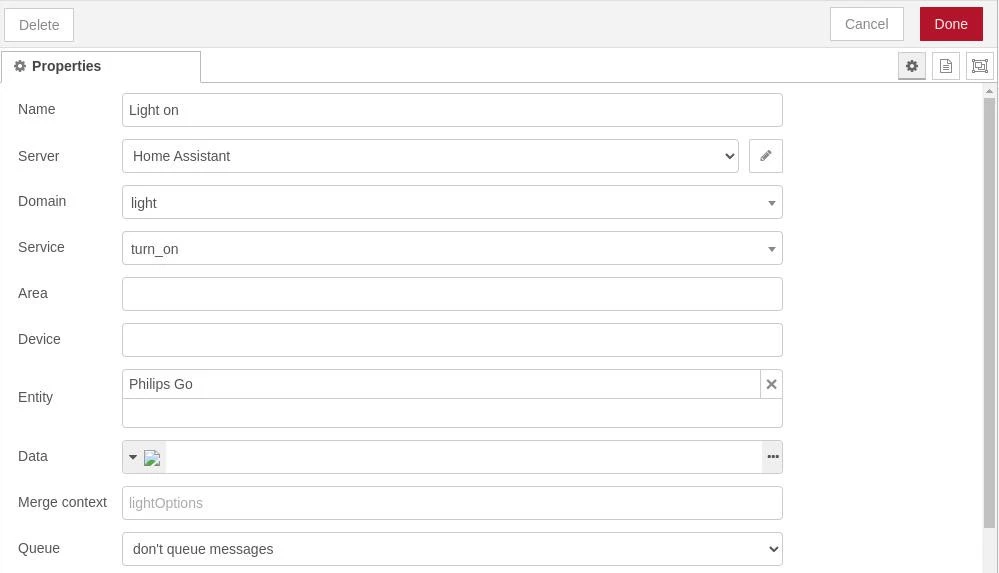
Just select the domain, the service and the entity according to the device that you want to call and you are good to go.
You can import this example flow from the following JSON:
Example Flow 1 as JSON
[{"id":"87efe223f4f827f1","type":"tab","label":"Flow 1","disabled":false,"info":"","env":[]},{"id":"a77872c7510fe7f1","type":"simplepush","z":"87efe223f4f827f1","key":"YourSimplepushKey","title":"Actionable notification","message":"Turn light on or off?","event":"","actions":"on, off","actionTimeout":180,"password":"","salt":"","name":"","outputs":2,"x":480,"y":260,"wires":[["d326294e6d94c273"],["cd9495be92c4de44"]]},{"id":"088008a53bec9939","type":"inject","z":"87efe223f4f827f1","name":"Trigger","props":[{"p":"payload"},{"p":"topic","vt":"str"}],"repeat":"","crontab":"","once":false,"onceDelay":0.1,"topic":"","payloadType":"date","x":330,"y":260,"wires":[["a77872c7510fe7f1"]]},{"id":"d326294e6d94c273","type":"api-call-service","z":"87efe223f4f827f1","name":"Light on","server":"67b9b5c6c9478365","version":5,"debugenabled":false,"domain":"light","service":"turn_on","areaId":[],"deviceId":[],"entityId":["light.philips_go"],"data":"","dataType":"jsonata","mergeContext":"","mustacheAltTags":false,"outputProperties":[],"queue":"none","x":660,"y":220,"wires":[[]]},{"id":"cd9495be92c4de44","type":"api-call-service","z":"87efe223f4f827f1","name":"Light off","server":"67b9b5c6c9478365","version":5,"debugenabled":false,"domain":"light","service":"turn_off","areaId":[],"deviceId":[],"entityId":["light.philips_go"],"data":"","dataType":"jsonata","mergeContext":"","mustacheAltTags":false,"outputProperties":[],"queue":"none","x":660,"y":300,"wires":[[]]},{"id":"67b9b5c6c9478365","type":"server","name":"Home Assistant","version":2,"addon":false,"rejectUnauthorizedCerts":false,"ha_boolean":"y|yes|true|on|home|open","connectionDelay":true,"cacheJson":true,"heartbeat":false,"heartbeatInterval":"30"}]Example Flow 2: Create a Vote Among Three People With Actionable Notifications
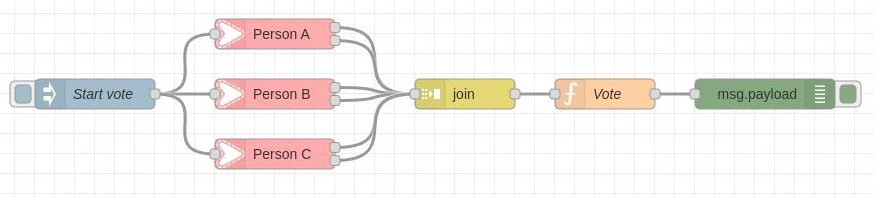
Imagine you live in a household of three and your noisy washing machine is connected to Home Assistant. Wouldn’t it be cool to create an automation where the washing machine only starts if a majority of the three people in the household agree that it’s okay to start it?
With Node-RED and Simplepush this works even if nobody is at home.
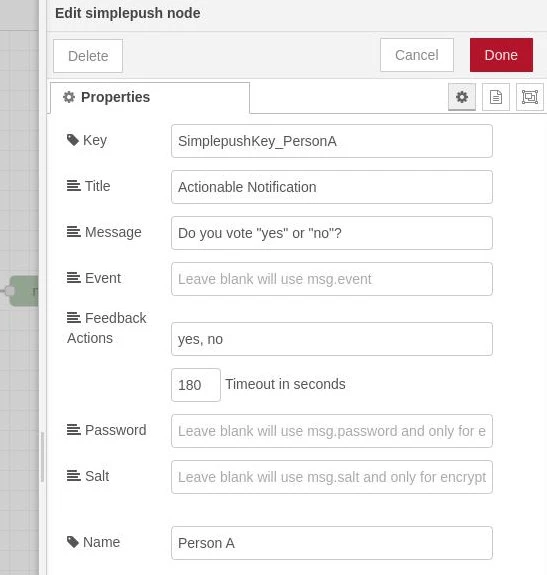
Create Simplepush Nodes for Each Person
We start by creating Simplepush nodes for each person. For each person add the same feedback actions (“yes” and “no”) in the settings. Choose a timeout that suits you. If you don’t know how timeouts work, take a look at the first example flow where we go into the details of timeouts.
Now connect all Simplepush nodes to an inject node. The inject node triggers the Simplepush nodes which in turn send out the defined actionable notifications. In reality you would most likely want to have a different trigger (e.g. a sensor or a button that is pushed).
Wait Until Everyone Selected an Action With “Join”
Join nodes are used to join together the input of several inputs into a single message.
For the use case we have in mind, we need the join node to only fire once all three actions where selected.
For this to be the case, we need to set “After a number of message parts” to 3 in the settings of the join node.
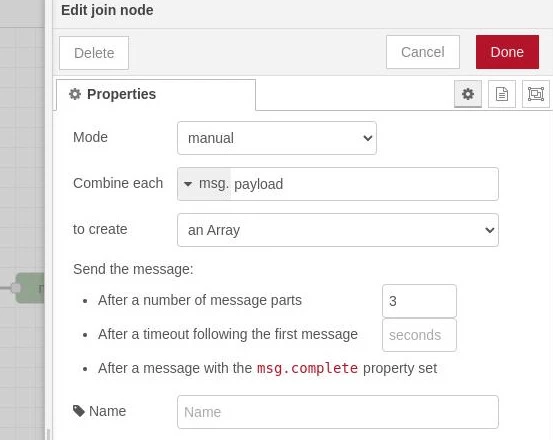
We also want to set the “to create” field to an Array.
This has the effect that all selected actions will be returned from the join node as an array.
// Example output of join node when set to "an Array"
[0: "yes", 1: "no", 2: "yes"]
Decide Which Action Was the Winner of the Vote
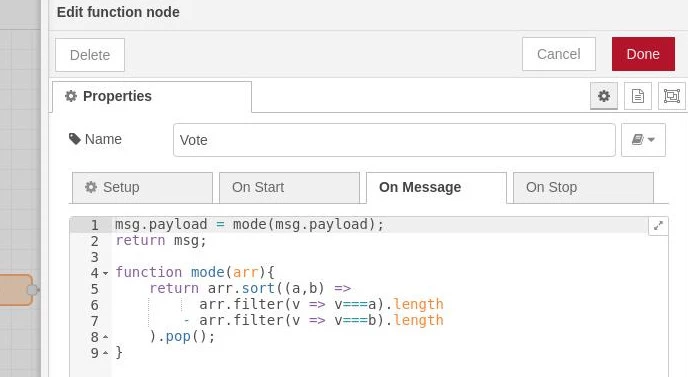
Everything that is left to do is to create a function node that decides which action won. The output of the function node should therefore either be “yes” or “no” depending on whether there are more “yes” or “no” in the input array that was passed to the function node.
To achieve this, create a function node with the following code:
// Function node to get voting result from array of votes
msg.payload = mode(msg.payload);
return msg;

function mode(arr){
    return arr.sort((a,b) =>
          arr.filter(v => v===a).length
        - arr.filter(v => v===b).length
    ).pop();
}
From here you could forward the voting result to a switch node that turns on the washing machine if the voting result is “yes”. In this example we created a debug node to print the result to the debugger.
You can import this example flow from the following JSON:
Example Flow 2 as JSON
[{"id":"87efe223f4f827f1","type":"tab","label":"Flow 1","disabled":false,"info":"","env":[]},{"id":"a77872c7510fe7f1","type":"simplepush","z":"87efe223f4f827f1","key":"SimplepushKey_PersonA","title":"Actionable Notification","message":"Do you vote \"yes\" or \"no\"?","event":"","actions":"yes, no","actionTimeout":180,"password":"","salt":"","name":"Person A","outputs":2,"x":460,"y":200,"wires":[["6dd7f2630d024483"],["6dd7f2630d024483"]]},{"id":"088008a53bec9939","type":"inject","z":"87efe223f4f827f1","name":"Start vote","props":[{"p":"payload"},{"p":"topic","vt":"str"}],"repeat":"","crontab":"","once":false,"onceDelay":0.1,"topic":"","payloadType":"date","x":280,"y":260,"wires":[["a77872c7510fe7f1","1827bb74f0b81030","e4780253aea5394e"]]},{"id":"1827bb74f0b81030","type":"simplepush","z":"87efe223f4f827f1","key":"SimplepushKey_PersonB","title":"Actionable Notification","message":"Do you vote \"yes\" or \"no\"?","event":"","actions":"yes, no","actionTimeout":180,"password":"","salt":"","name":"Person B","outputs":2,"x":460,"y":260,"wires":[["6dd7f2630d024483"],["6dd7f2630d024483"]]},{"id":"6dd7f2630d024483","type":"join","z":"87efe223f4f827f1","name":"","mode":"custom","build":"array","property":"payload","propertyType":"msg","key":"feedbackId","joiner":"\\n","joinerType":"str","accumulate":false,"timeout":"","count":"3","reduceRight":false,"reduceExp":"","reduceInit":"","reduceInitType":"","reduceFixup":"","x":650,"y":260,"wires":[["c56f21c6905f9133"]]},{"id":"e4780253aea5394e","type":"simplepush","z":"87efe223f4f827f1","key":"SimplepushKey_PersonC","title":"Actionable Notification","message":"Do you vote \"yes\" or \"no\"?","event":"","actions":"yes, no","actionTimeout":180,"password":"","salt":"","name":"Person C","outputs":2,"x":460,"y":320,"wires":[["6dd7f2630d024483"],["6dd7f2630d024483"]]},{"id":"c56f21c6905f9133","type":"function","z":"87efe223f4f827f1","name":"Vote","func":"msg.payload = mode(msg.payload);\nreturn msg;\n\nfunction mode(arr){\n return arr.sort((a,b) =>\n arr.filter(v => v===a).length\n - arr.filter(v => v===b).length\n ).pop();\n}","outputs":1,"noerr":0,"initialize":"","finalize":"","libs":[],"x":790,"y":260,"wires":[["21b66fa3bbecc2f8"]]},{"id":"21b66fa3bbecc2f8","type":"debug","z":"87efe223f4f827f1","name":"","active":true,"tosidebar":true,"console":false,"tostatus":false,"complete":"payload","targetType":"msg","statusVal":"","statusType":"auto","x":950,"y":260,"wires":[]}]Example Flow 3: Let the Faster Person Decide
When an action is selected, the Simplepush node outputs a message that contains the selected action as its payload (msg.payload).
In addition the message also includes metadata. For example msg.actionDeliveredAt is a timestamp describing the exact time the information about the action reached the Simplepush backend (this can differ from msg.actionSelectedAt since an action can be selected while the device is offline).
In this example flow we will make use of msg.actionSelectedAt to decide who is first in selecting an action from an actionable notification.

First we fire off two actionable notifications to two different persons with an inject node.
In order to be able to identify which actionable notification corresponds to which person, we make use of the change node that sets a person property.
If an action gets selected, it will be passed to a join node.
The join node then waits for both actions to be selected before it forwards the joined result.
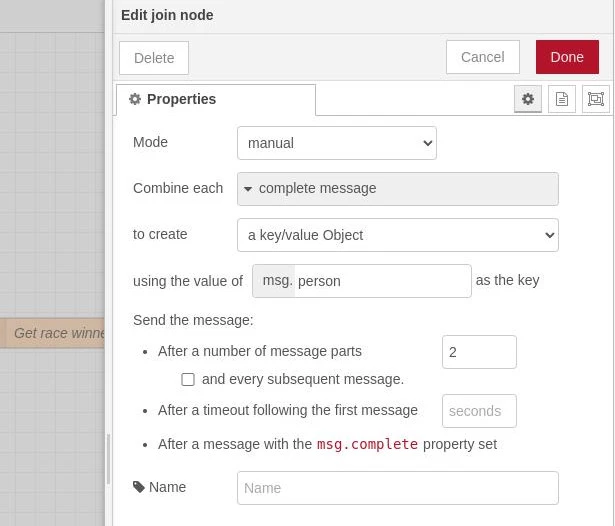
Make sure to select “a key/value Object” on the “to create” field. This will create an object where the person property is the key and the Simplepush node output is the value.
The last step is to decide who won. We do that with a function node that contains the following javascript code and gets its input from the join node.
var min = Object.keys(msg.payload).map(function(k) {
    return msg.payload[k];
}).reduce(function(a, b) {
    return b.actionSelectedAt < a.actionSelectedAt ? b : a;
});

msg.payload = min;
return msg;
This javascript code returns the object (at msg.payload) that has the smallest actionSelectedAt property.
Example Flow 3 as JSON
[{"id":"f0c1e703970d918b","type":"tab","label":"Flow 1","disabled":false,"info":""},{"id":"f634b1832cf41094","type":"simplepush","z":"f0c1e703970d918b","key":"SimplepushKey_PersonA","title":"Actionable Notification","message":"Select as fast as possible","event":"","actions":"Done","actionTimeout":180,"password":"","salt":"","name":"Person A","outputs":1,"x":320,"y":260,"wires":[["2991a951afeac0a9"]]},{"id":"ccf0f642d9cf07ad","type":"inject","z":"f0c1e703970d918b","name":"Start race","props":[{"p":"payload"},{"p":"topic","vt":"str"}],"repeat":"","crontab":"","once":false,"onceDelay":0.1,"topic":"","payloadType":"date","x":180,"y":300,"wires":[["f634b1832cf41094","14fdd06813e27a21"]]},{"id":"14fdd06813e27a21","type":"simplepush","z":"f0c1e703970d918b","key":"SimplepushKey_PersonB","title":"Actionable Notification","message":"Select as fast as possible","event":"","actions":"Done","actionTimeout":180,"password":"","salt":"","name":"Person B","outputs":1,"x":320,"y":340,"wires":[["e4b8e717036d44c6"]]},{"id":"1dc1e1409d4d7e2f","type":"join","z":"f0c1e703970d918b","name":"","mode":"custom","build":"object","property":"","propertyType":"full","key":"person","joiner":"\\n","joinerType":"str","accumulate":false,"timeout":"","count":"2","reduceRight":false,"reduceExp":"","reduceInit":"","reduceInitType":"","reduceFixup":"","x":690,"y":300,"wires":[["0e1fd7577f34f4c3"]]},{"id":"0e1fd7577f34f4c3","type":"function","z":"f0c1e703970d918b","name":"Get race winner","func":"var min = Object.keys(msg.payload).map(function(k) {\n return msg.payload[k];\n}).reduce(function(a, b) {\n return b.actionSelectedAt < a.actionSelectedAt ? b : a;\n});\n\nmsg.payload = min;\nreturn msg;","outputs":1,"noerr":0,"initialize":"","finalize":"","libs":[],"x":720,"y":360,"wires":[["48c070e1e2ae3691"]]},{"id":"2991a951afeac0a9","type":"change","z":"f0c1e703970d918b","name":"","rules":[{"t":"set","p":"person","pt":"msg","to":"A","tot":"str"}],"action":"","property":"","from":"","to":"","reg":false,"x":500,"y":260,"wires":[["1dc1e1409d4d7e2f"]]},{"id":"e4b8e717036d44c6","type":"change","z":"f0c1e703970d918b","name":"","rules":[{"t":"set","p":"person","pt":"msg","to":"B","tot":"str"}],"action":"","property":"","from":"","to":"","reg":false,"x":500,"y":340,"wires":[["1dc1e1409d4d7e2f"]]},{"id":"48c070e1e2ae3691","type":"debug","z":"f0c1e703970d918b","name":"","active":true,"tosidebar":true,"console":false,"tostatus":false,"complete":"payload","targetType":"msg","statusVal":"","statusType":"auto","x":710,"y":420,"wires":[]}]Example Flow 4: Dynamically Decide Which Actions Your Actionable Notification Should Have
If you don’t know upfront which actions your actionable notification should include, you can pass an array of strings to the Simplepush node input at runtime.
The action array has to be included via the actions property of the input message.
Since in this case it is decided at runtime which actions will be included in an actionable notification, there is only one output on the Simplepush node (unlike when you define actions in the settings).
To demonstrate how to define actions at runtime, we create an inject node that forwards the current timestamp to a function node.
The function node forwards msg.actions = ['action 1'] to our Simplepush node if the injected timestamp is divisible by two and msg.actions = ['action 2'] otherwise.
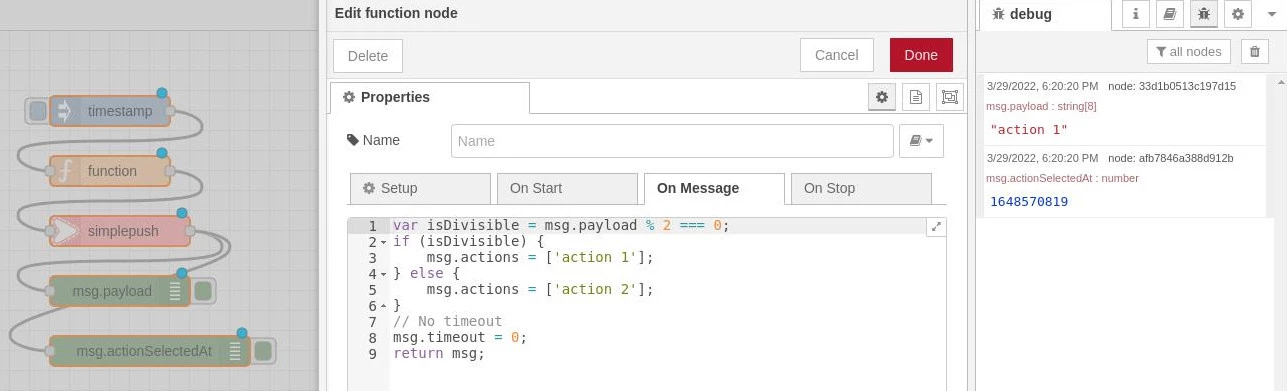
The function node can be implemented with the following javascript code:
var isDivisible = msg.payload % 2 === 0;
if (isDivisible) {
    msg.actions = ['action 1'];
} else {
    msg.actions = ['action 2'];
}
// No timeout
msg.timeout = 0;
return msg;
We set msg.timeout to zero which disables timeouts. The default would be a timeout after 180 seconds if no action was selected.
When an action is selected, the action (either “action 1” or “action 2”) and its metadata (e.g. msg.actionSelectedAt which contains the timestamp of the exact date when the action was selected) is written to the single output of the Simplepush node.
Example Flow 4 as JSON
[{"id":"f0c1e703970d918b","type":"tab","label":"Flow 1","disabled":false,"info":""},{"id":"f634b1832cf41094","type":"simplepush","z":"f0c1e703970d918b","key":"YourSimplepushKey","title":"Actionable Notification","message":"The actions are chosen at runtime","event":"","actions":"","actionTimeout":180,"password":"","salt":"","name":"","outputs":1,"x":570,"y":200,"wires":[["33d1b0513c197d15","afb7846a388d912b"]]},{"id":"d9e6ce119d5ee5ed","type":"function","z":"f0c1e703970d918b","name":"","func":"var isDivisible = msg.payload % 2 === 0;\nif (isDivisible) {\n msg.actions = ['action 1'];\n} else {\n msg.actions = ['action 2'];\n}\n// No timeout\nmsg.timeout = 0;\nreturn msg;","outputs":1,"noerr":0,"initialize":"","finalize":"","libs":[],"x":560,"y":140,"wires":[["f634b1832cf41094"]]},{"id":"ccf0f642d9cf07ad","type":"inject","z":"f0c1e703970d918b","name":"","props":[{"p":"payload"},{"p":"topic","vt":"str"}],"repeat":"","crontab":"","once":false,"onceDelay":0.1,"topic":"","payloadType":"date","x":560,"y":80,"wires":[["d9e6ce119d5ee5ed"]]},{"id":"33d1b0513c197d15","type":"debug","z":"f0c1e703970d918b","name":"","active":true,"tosidebar":true,"console":false,"tostatus":false,"complete":"false","statusVal":"","statusType":"auto","x":570,"y":260,"wires":[]},{"id":"afb7846a388d912b","type":"debug","z":"f0c1e703970d918b","name":"","active":true,"tosidebar":true,"console":false,"tostatus":false,"complete":"actionSelectedAt","targetType":"msg","statusVal":"","statusType":"auto","x":600,"y":320,"wires":[]}]