Simplepush Blog
Frigate Notifications with Simplepush
- Install Simplepush HACS Integration
- Simplepush HACS Integration Configuration
- Enable Remote Access for Home Assistant (Optional)
- Simplepush Frigate Blueprint
Warning: The blueprint for sending push notifications from Frigate NVR, which is linked in this article, is still in beta. It might not work perfectly in all situations.

Frigate is an open-source Network Video Recorder (NVR) software that specializes in object detection for home security and surveillance systems. It is designed to work with IP cameras and is compatible with a wide range of models from various manufacturers.
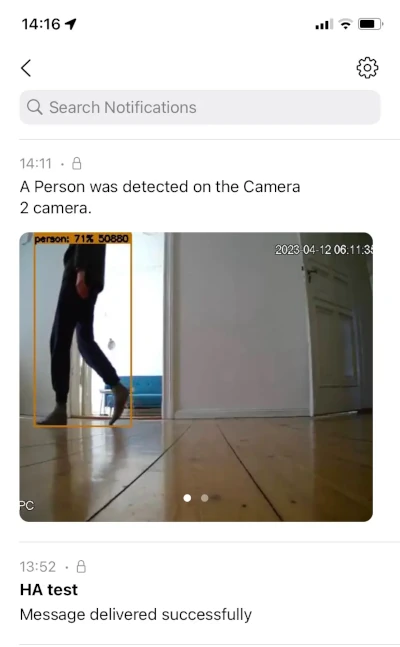
In this article you will learn how to get a timeline of your Frigate events on your phone. The timeline will consist of the Frigate snapshot and the Frigate video clip for a given Frigate event.
We will make use of Simplepush instead of the Home Assistant Companion app, which is usually used for this task, to get a history of your Frigate events that can be quickly revisited by opening the Simplepush app on your phone.
Simplepush is an app for Android and iOS that makes it easy to receive and customize notifications. It supports attachments (pictures, GIFs and videos) which makes it a perfect match for Frigate NVR.
In addition, it supports notification caching for up to 100 notifications. This means that iOS devices will be notified about Frigate events that happend while the device was offline, which currently is not the case for the iOS Home Assistant Companion app.
This article will assume that you already have a running Home Assistant and Frigate instance that can talk to each other. If that is not the case, please have a look at this guide on how to setup Home Assistant with Frigate NVR.
Install Simplepush HACS Integration
We need to install the custom Simplepush HACS integration since the Simplepush integration that can be found directly in the integrations section of Home Assistant doesn’t support actionable notifications yet. Support for actionable notifications is required because the blueprint supports the silencing of new notifications by selecting an action in an actionable notification.
Before installing the custom Simplepush HACS integration, ensure that you uninstall the default Simplepush integration from your Home Assistant instance, if it is installed. Having both Simplepush integrations installed at the same time, will lead to trouble.
- If necessary, remove the default Simplepush integration
- Install HACS.
- Once you have installed HACS, go to the Home Assistant web interface and click on the HACS icon in the sidebar.
- Click on the 3 dots in the top right corner.
- Select “Custom repositories”.
- Insert the link to the Simplepush HACS Github page (https://github.com/simplepush/simplepush-hacs-integration).
- Select the “Integration” category.
- Click the “ADD” button.
- Click on “Simplepush HACS” in the HACS overview and download the integration.
- Restart Home Assistant.
You can also install the custom Simplepush integration without using HACS as an alternative. For that just follow the instructions on how to manually install the Simplepush HACS integration.
Simplepush HACS Integration Configuration
- Download the Simplepush app on your phone. You will get a unique key that will be used to identify your device.
- In the app go to “Settings” -> “Setup Encryption” to setup a password and see your salt
- In the Home Assistant UI go to “Settings” -> “Integrations” click “+” and search for “Simplepush”.
- Select the Simplepush version without an icon (the version with an icon is the default integration that doesn’t support actionable notifications).
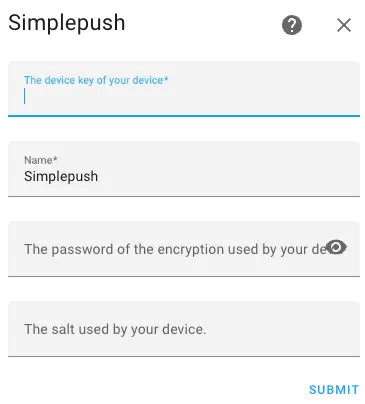
- Insert the Simplepush key you got when installing the app into the first field
- Insert the password and salt that specified in the app

After submitting the configuration form, all notifications sent from Home Assistant to your Simplepush app will be end-to-end encrypted.
While the Simplepush Frigate blueprint will also work when no end-to-end encryption is used, it is highly recommended to use end-to-end encryption for enhanced security.
Enable Remote Access for Home Assistant (Optional)
If you want to be able to receive and revisit notifications sent by Frigate while not being connected to your local network, it is necessary to enable remote access to your Home Assistant instance.
Be aware that opening up your Home Assistant instance to the internet is always a security risk. Please make sure to use a strong password for your Home Assistant users!
The following video gives a great step by step guide on how to setup Home Assistant for remote access.
An alternative to opening up your Home Assistant instance could be establishing a VPN connection to your home network from your phone. Wireguard is a great solution for that.
Simplepush Frigate Blueprint
The Simplepush Frigate blueprint can be found here: https://gist.github.com/simplepush/c9ec938667c3aecb30adf8db26dea99c.
It is a fork of the original Frigate blueprint by SgtBatten and hunterjm which uses the Home Assistant Companion app instead of Simplepush.
The Simplepush Frigate blueprint currently supports the following:
- Sending an (encrypted) notification for every new Frigate event with the snapshot and video clip attached.
- Silencing new notifications for a configurable time period with an action button in the notification. This is helpful for situations where you already know that events will be triggered.
- Disable notifications if a presence entity or group is home.
- Configure a cooldown to reduce the number of notifications that occur when an event triggers multiple time.
- Disable notifications at certain times.
- Minimum Frigate Version: 0.11.0.
- Minimum Frigate Integration Version: 3.0.0.
Feel free to send an email to contact@simplepush.io, if there is a feature that is absolutely required for you that is currently not supported.
To import the blueprint:
- Go to
Settings->Automations & Scenes->Blueprints->Import Blueprint. - Then you can paste in the URL to the blueprint and click
Preview.
Alternatively you can just click the Import Blueprint at the beginning of this section.
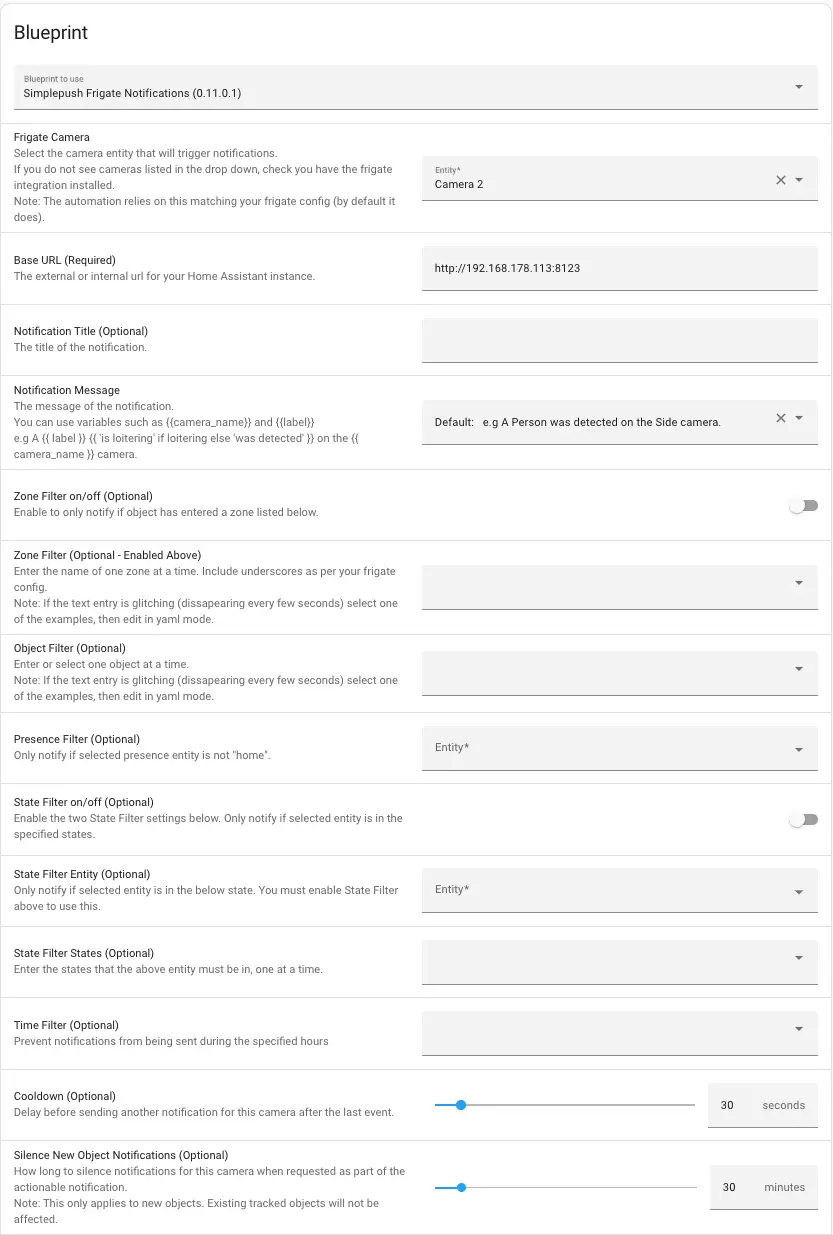
After you imported the blueprint, click the Create Automation link on the Simplepush Frigate Notifications blueprint entry.
Make sure to fill out the Base URL field which is a required field.
You have two options for the Base URL: it can either be the local IP address and port, or the URL and port that is used to access your Home Assistant instance from outside of your local network.

After you selected your camera, set the base URL of your Home Assistant instance and adjusted everything else to your liking, you can save the automation. Once saved you should get a notification to your Simplepush app once an object is detected.
Share on: