Simplepush Blog
The Ultimate Guide to Frigate NVR Notifications
If you are looking for an alternative to the Home Assistant Companion App that supports a timeline, end-to-end encryption and more, have a look at this article about sending notifications from Frigate NVR with the Simplepush app.
Frigate NVR is an open source and mostly free NVR (Network Video Recorder) for real-time object detection. This means that you can use Frigate to alert you and record videos when predefined objects like humans, animals or other objects become visible to your cameras.
With Frigate all processing is performed locally on your hardware which gives you full control on which parts of your setup are exposed to the internet if any.
In this article you will learn how to:
- Setup Mosquitto MQTT and Frigate NVR in Docker
- Integrate Frigate and MQTT with your Home Assistant instance
- Create push notifications that notify you about Frigate events
Be aware that in order to achieve low inference speeds, it is recommened to use a Google Coral TPU on the server you will run Frigate on. Also check out this list of recommended servers to get a feeling for the hardware requirements.
Frigate NVR Installation
For this guide we will use the recommended way of running Frigate standalone in Docker.
Before we install Frigate NVR, we need to setup a MQTT broker. MQTT is a lightweight publish-subscribe protocol which is used by Frigate NVR to publish events. These events then can be picked up by other services like Home Assistant and Node-RED through MQTT.
Run Mosquitto MQTT in Docker
For this guide we will use the Eclipse Mosquitto MQTT broker and run it in Docker. The Mosquitto MQTT service can also be run directly on your machine (without Docker).
If you use Home Assistant Supervised or HassOS, you can also install the Mosquitto broker as an add-on to Home Assistant.
First let’s create some necessary directories on the Docker host. You can change the locations of these directories to whatever you like as long as you then adjust the Docker run command later on.
mkdir -p /storage/mosquitto/config
mkdir -p /storage/mosquitto/data
mkdir -p /storage/mosquitto/log
Now create /storage/mosquitto/config/mosquitto.conf with the following content:
user mosquitto

# Save message data to disk
persistence true
persistence_location /mosquitto/data/

# Listen on all interfaces
# Required to allow for connections from outside of localhost
listener 1883

log_dest file /mosquitto/log/mosquitto.log
log_dest stdout

# Can be set to true if anonymous access is okay
allow_anonymous false

# Only required if allow_anonymous is set to false
password_file /mosquitto/config/passwd
If you defined a password_file in your mosquitto.conf configuration file, please place an empty passwd file into /storage/mosquitto/config on your Docker host.
Otherwise our Mosquitto MQTT container will complain once we try to start it.
touch /storage/mosquitto/config/passwd
You can now run the Eclipse Mosquitto MQTT container:
docker run -itd \
--name=mqtt \
--restart=always \
--network=host
-v /storage/mosquitto/config:/mosquitto/config \
-v /storage/mosquitto/data:/mosquitto/data \
-v /storage/mosquitto/log:/mosquitto/log \
eclipse-mosquitto
If you previously decided to forbid anonymous access to Mosquitto MQTT in your mosquitto.conf file and created an empty passwd file, it’s now time to add a username and password.
For that we have to connect to the Mosquitto MQTT container:
docker exec -it mqtt sh
Now that you opened a shell in the Mosquitto Docker container, set a username and a password:
mosquitto_passwd -c /mosquitto/config/passwd john
This will open a prompt where you can enter and confirm a password for user “john”.
Disconnect from the container, restart the container (docker restart mqtt) and you are ready to go.
Testing your Mosquitto MQTT Docker Container
If you want to test your MQTT installation, install the mosquitto-clients package and publish a test message to a topic that you subscribed to:
sudo apt install mosquitto-clients

mosquitto_sub -h mqtt_host -t test/topic &
mosquitto_pub -h mqtt_host -t test/topic -m "This will be printed to the console if you are subscribed to test/topic"
You can use -u and -P to provide username and password when you use the mosquitto_sub and mosquitto_pub command line tools.
mosquitto_sub -h mqtt_host -t test/topic -u "john" -P "password"
Run Frigate in Docker
After you have finished setting up your MQTT broker, it’s time to setup Frigate NVR.
Frigate NVR Configuration
Let’s create a minimal configuration file for Frigate NVR.
In this guide we will assume that you use a Coral TPU and already have a camera stream running.
If you don’t have a Coral TPU, you can get rid of the detectors section in your configuration file.
All you need to adjust is the address of your camera stream and the MQTT host.
For further adjustments check out the official Frigate Configuration Guide.
config.yml
mqtt:
  host: <ip of your mqtt server>
  user: <username for mqtt server> # <----- Can be removed if allow_anonymous is set to true
  password: <password for mqtt server> # <----- Can be removed if allow_anonymous is set to true

detectors:
  coral:
    type: edgetpu
    device: usb

cameras:
  camera_1: # <------ Name the camera
    ffmpeg:
      inputs:
        - path: rtsp://10.0.10.10:554/rtsp # <----- Update for your camera
          roles:
            - detect
            - rtmp
    rtmp:
      enabled: False # <-- RTMP should be disabled if your stream is not H264
    detect:
      width: 1280 # <---- update for your camera's resolution
      height: 720 # <---- update for your camera's resolution
    record:
      enabled: True # <-- retains recordings for 10 days on default
    snapshots:
      enabled: True # <-- retains snapshots for 10 days on default
If your camera offers two streams where one has a higher resolution than the other, it makes sense to use the stream with the lower resolution for detection while using the one with a higher resolution for recording.
This can be achieved by adding an additional path in the inputs section of your camera in the Frigate config file and assigning separate roles for each path:
cameras:
  camera_1: # <------ Name the camera
    ffmpeg:
      inputs:
        - path: rtsp://10.0.10.10:554/lq # <----- Low quality stream of your camera that is used for detection
          roles:
            - detect
            - rtmp
        - path: rtsp://10.0.10.10:554/hq # <----- High quality stream of your camera that is used for recording
          roles:
            - record
While you could run Frigate without recordings and snapshots enabled (e.g. if you only want to be notified and don’t care about seeing whatever was detected), in this guide we want to receive push notifications that let us watch the clip and snapshot of what has been detected.
Have a look at the official Frigate documentation to learn how to further customize your configuration file to your needs. Useful adjustments could be:
- Decreasing the frames per second for detection to 5.
- Creating motion masks and object filters to specify where and what should be detected.
If your camera stream is password protected, you can adjust the path to your camera stream to use your username and password. This requires that you set the password when starting the docker container.
- path: rtsp://viewer:{FRIGATE_RTSP_PASSWORD}@10.0.10.10:554/rtsp
Running Frigate
Just run the following command and you are good to go with a Frigate instance running on port 5000:
docker run -d \
  --name frigate \
  --restart=unless-stopped \
  --mount type=tmpfs,target=/tmp/cache,tmpfs-size=1000000000 \
  --device /dev/bus/usb:/dev/bus/usb \
  --device /dev/dri/renderD128 \
  --shm-size=64m \
  -v /path/to/your/storage:/media/frigate \
  -v /path/to/your/config.yml:/config/config.yml:ro \
  -v /etc/localtime:/etc/localtime:ro \
  -e FRIGATE_RTSP_PASSWORD='password' \
  -p 5000:5000 \
  -p 1935:1935 \
  blakeblackshear/frigate:stable
If you get the error
IsADirectoryError: [Errno 21] Is a directory: '/config/config.yml', verify that you provided the absolute path to yourconfig.ymlfile in the previous docker command.
If you see
[Errno 111] Connection refusedwhen you start Frigate, make sure that you provided the correct MQTT and camera stream addresses in your Frigate configuration file.
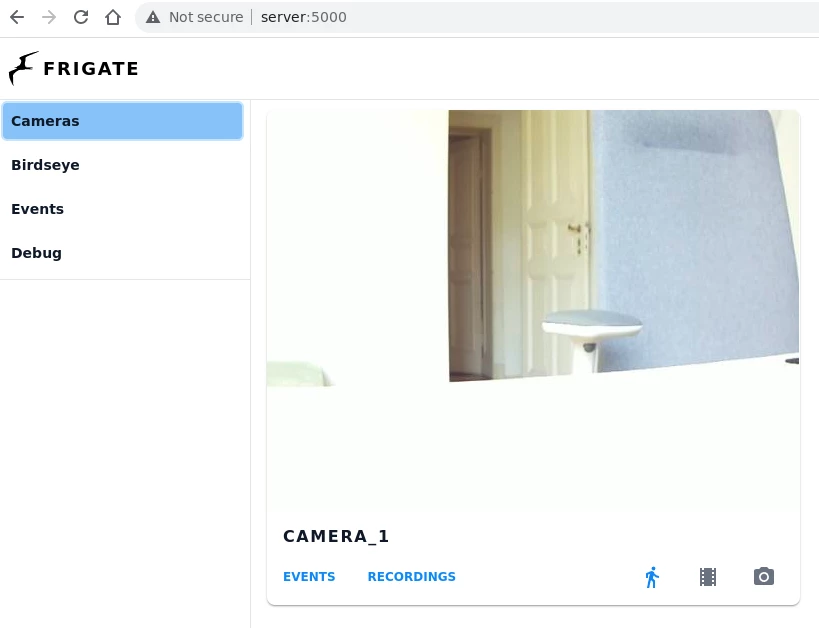
Once Frigate is running, verify that you can access the Frigate UI with your browser on http://your-frigate-server:5000. You should also be able to see the video feed of your camera in the Frigate UI.
The current setup is enough for us to receive notifications with snapshots and clips attached.
Frigate Notification Blueprint for Home Assistant
In order to setup push notifications for Frigate events, we will make use of the Frigate Notification Blueprint (originally written by hunterjm and forked by SgtBatten). The blueprint currently supports Frigate 0.11 and 0.12.
We will use the blueprint to create a Home Assistant automation that will send push notifications to your Home Assistant Companion App.
For that to work we will first have to establish a connection between Home Assistant, Frigate NVR and our previously setup Mosquitto MQTT server.
If you are running HassOS or Home Assistant Supervised, it’s recommended to use Frigate’s Proxy Addon and run Frigate NVR in Docker instead of running Frigate as an add-on.
Connect Home Assistant to MQTT
In order for Home Assistant to know about Frigate NVR events, we need to connect Home Assistant to the same MQTT server as Frigate.
Home Assistant > Configuration > Integrations > Add Integration > MQTT
Make sure to enter the username and password that you defined previously when you created the configuration for the Mosquitto MQTT Docker container.
If you allow for anonymous connections and didn’t setup a username and password, leave the username and password fields empty.
If MQTT runs on the same host as Home Assistant, use localhost for the Broker field.
Otherwise use the hostname or IP address of the server where your MQTT container is running.
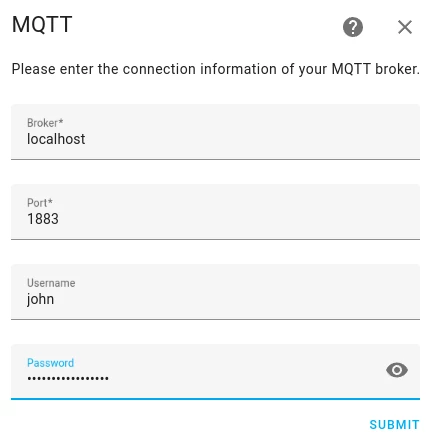
Home Assistant Integration
For this guide we will assume that you already have a running Home Assistant instance.
To connect Frigate NVR to Home Assistant, install the official integration with HACS.
Home Assistant > HACS > Integrations > "Explore & Add Integrations" > Frigate
Restart Home Assistant, then add and configure the integration:
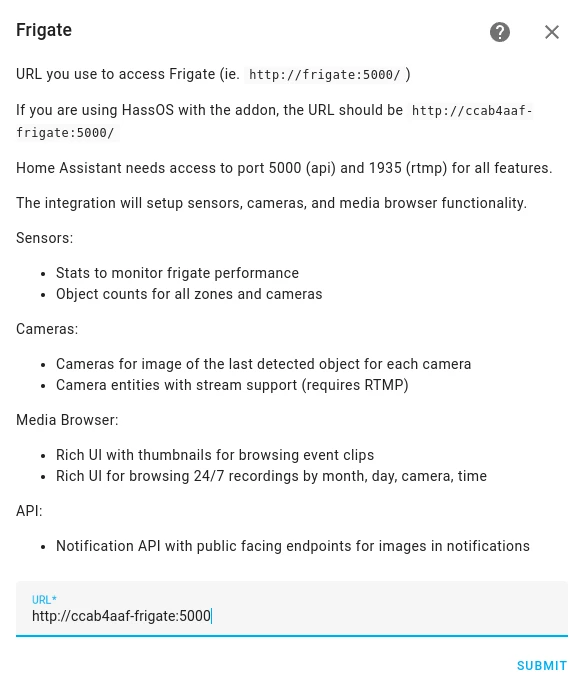
Home Assistant > Configuration > Integrations > Add Integration > Frigate
Adjust the address and port number for your Frigate NVR instance and submit the form.
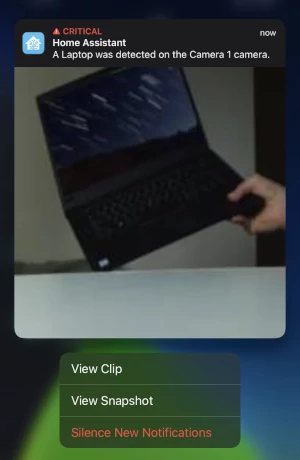
Setup Push Notifications for Frigate Events
Now that we have a running Frigate instance and connected it to Home Assistant, we can setup push notifications to the Home Assistant Companion App for events fired from Frigate NVR.
The easiest way to setup push notifications to your mobile phone when Frigate events fire, is to use the Frigate Mobile App Notification Blueprint for Home Assistant by SgtBatten.
 Click the above button to import the Frigate Notification Blueprint to your Home Assistant instance.
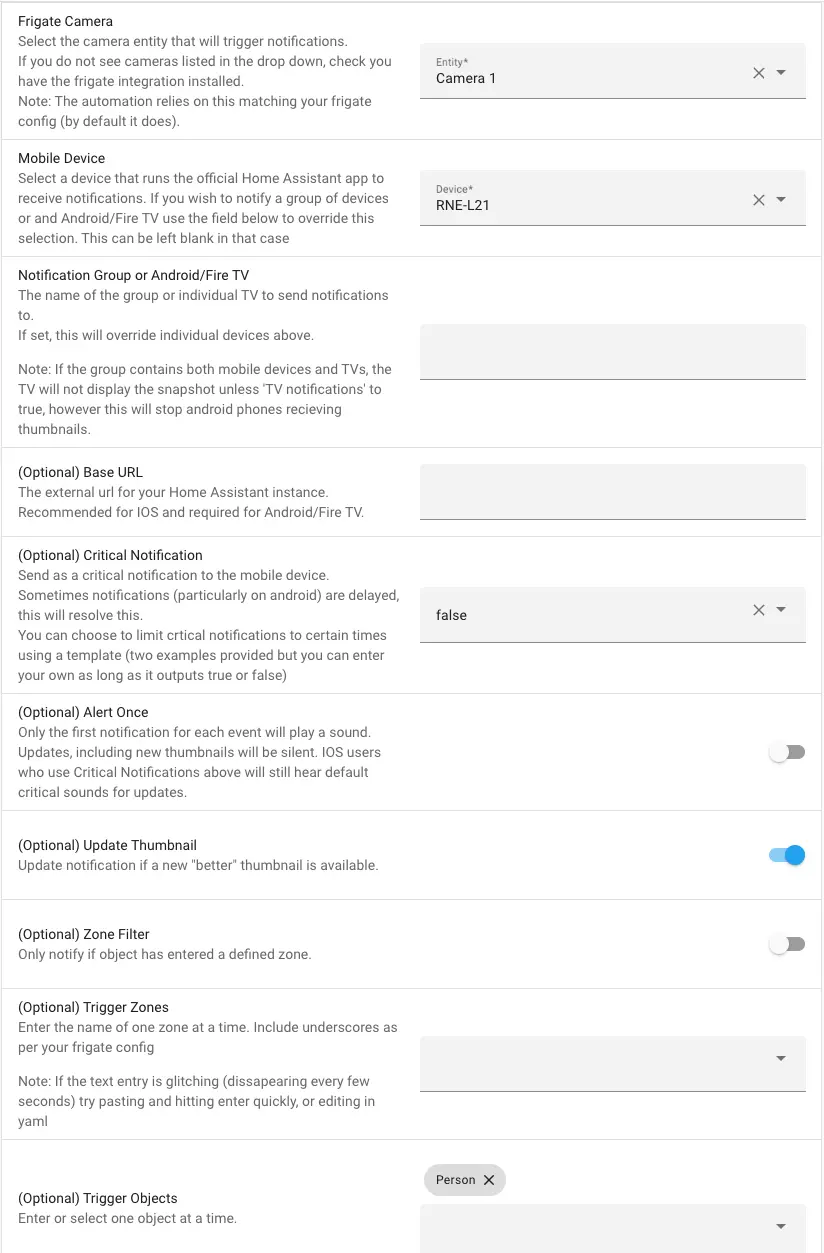
After importing the Frigate Notification Blueprint, you can create a Home Assistant automation from the blueprint by clicking Create Automation.
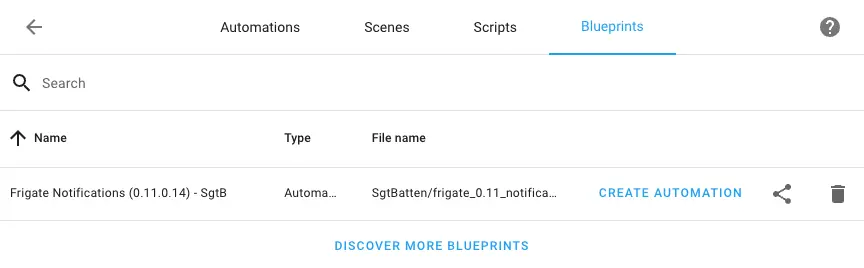
The setup of the Frigate Notification automation is straighforward.
At a minimum just select the camera, as previously defined in your Frigate configuration, and the mobile phone or a notification group for which you want to receive the push notifications.
Remote Access for Frigate Push Notifications
If you want your Frigate notifications to work properly even when your mobile phone is not connected to your local network, you need to provide a Home Assistant URL to your HA instance that is also accessible from outside of your local network. That address has to be placed into the Base URL field.
The following video shows how to properly setup Home Assistant for remote access.
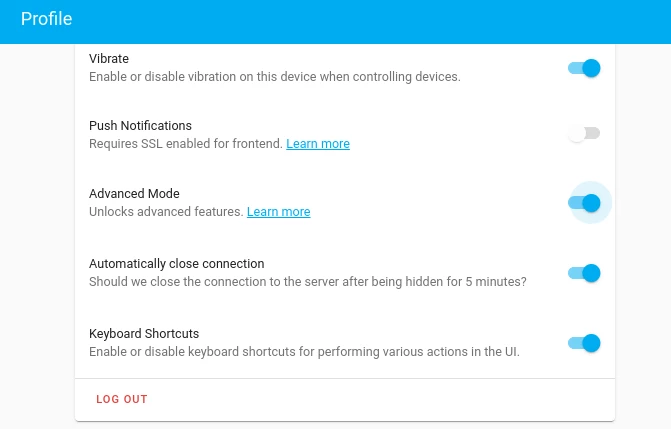
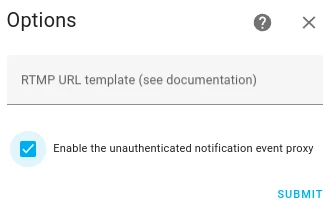
Once you have setup remote access to Home Assistant, you will need to enable the unauthenticated notification event proxy option in the Frigate Home Assistant integration that we installed earlier. This is a necessary step for making remote access to snapshots and clips work.
Before we can enable the option, we have to enable the Home Assistant Advanced Mode in your Home Assistant user’s profile (bottom left in the Home Assistant web UI).
Now the unauthenticated notification event proxy option will be visible in the Frigate integration:
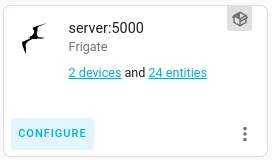
Enable the unauthenticated notification event proxy option and submit the form.
Advanced Options for Frigate Push Notifications
Other features of the Frigate Notification Blueprint include:
- Limiting notifications to predefined zones so that a notification is only sent when an object is in the predefined zone
- Specifing which objects to be notified about (this requires that you also specify these objects in your Frigate configurations file - on default only persons are tracked)
- Notifications can be disabled if a Home Assistant presence entity or group is recognized as at home
- A cooldown period can be defined that has to pass before new notifications can be sent
- You can silence future notification for a certain amount of time with the click on the silence new notification action button
- A loitering notification can be sent for objects that didn’t move for the defined loitering timespan
Once you save the changes, the automation is activated and we are ready to go. Just jump in front of your camera and see how Home Assistant and Frigate NVR will notify you about your emergence (or any other object that is configured to be tracked).
IOS users only: If you click on an action button in a Frigate notification and get to an empty screen of the Home Assistant app, turn off the Remember Last Page option in “Settings -> Companion App -> General” of the iOS Home Assistant app.
For a more general explanation on the possibilites of using Frigate NVR with Home Assistant the following video is highly recommended. It also provides a more visual explanation on how to use the Frigate Notification Blueprint to send push notifications on Frigate events.
Share on: